Block Preview Image is an important part of showing a visual look of any Gutenberg block. It gives a clear visualization of the block to the users. As a result, users can easily understand the look and feel of the block and its functionalities.
If you are developing a custom Gutenberg block, the block preview image feature is needed for the block to give a clean visualization to your block users. So, in this article, I will explain various ways to add the block preview for your custom Gutenberg block. Enjoy this article and apply the trick to your existing and upcoming blocks to enhance your block’s visualization to your users.
What is a Block Preview Image
Block preview is a visual look of a block that users can easily see before inserting the block in the main editor. A user can see the block’s look and its functionalities without inserting the block.
Gutenberg block editor has 3 major parts, and Blocks Insert Library is one of them. Blocks Insert Library includes Gutenberg blocks including core and custom blocks. To insert a block in the block editor, if a user uses the blocks insert library, then the user has to click on the expected block icon. During this time, when the user hovers over the expected block, a preview of the block becomes visible on the right side which is called the Block Preview of the block.
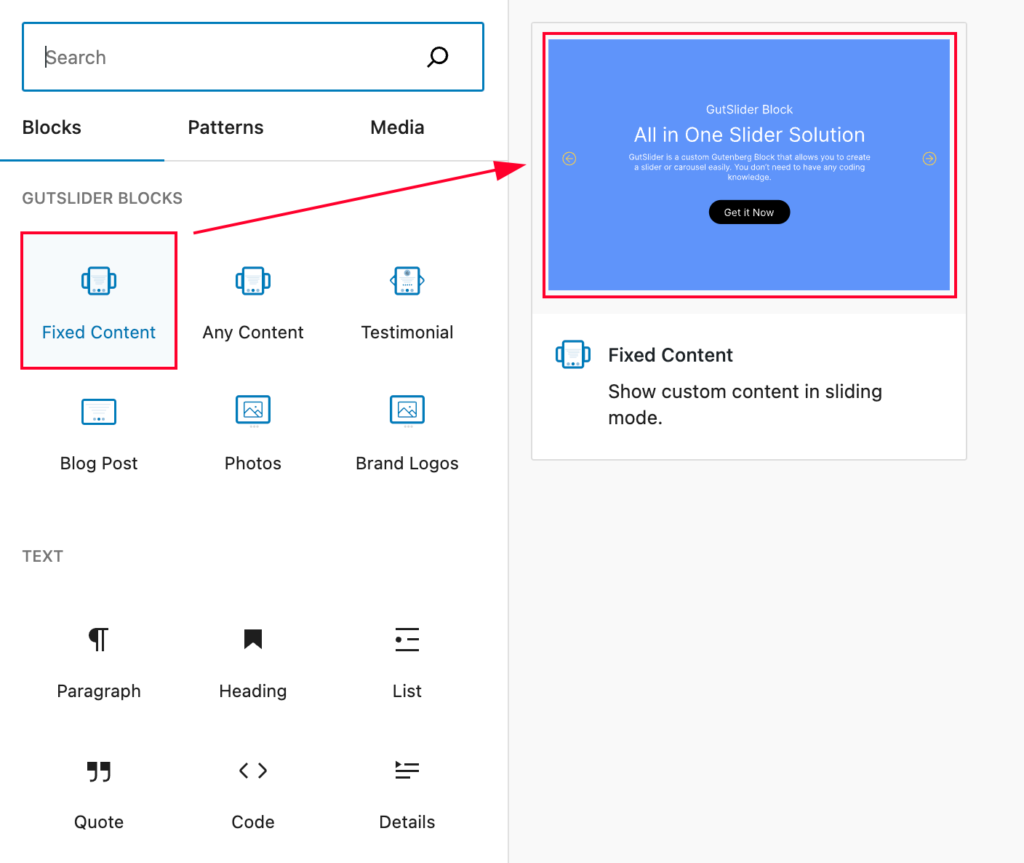
For example, if we want to use the Fixed Content slider from the GutSlider Gutenberg Block from the blocks insert library, we have to hover over the block, when we hover we can see the Fixed Content Slider block preview image like this:-
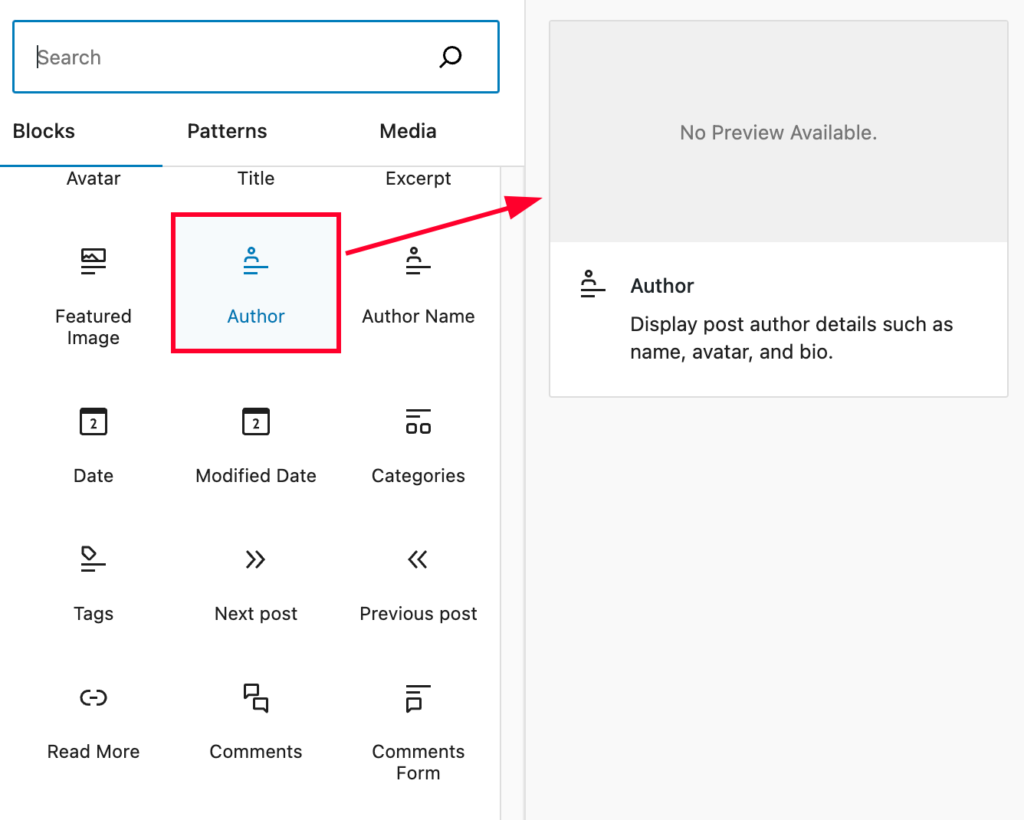
Sometimes you will find some blocks where no block preview image is available. Then you will find that the block will show an empty preview just like the following screenshot:-
Add Block Preview Image to Custom Block
I hope you have understood the basic concept of the block preview image. Let’s explore how it is working behind the scenes. In the case of the GutSlider, a custom image has been used as the block preview image. But it is not necessary to use a custom image always for your block.
Basically, there are two ways to add a block preview image in your custom block. You can either generate the preview automatically passing your block’s attribute values or use a custom image as a block preview just like as GutSlider block.
I will explain both ways so that you can understand both of them and apply any one as per your needs. Let’s try the first one where we will generate the block preview automatically by passing the block attributes’ values.
Generate Preview from Attributes
I hope you are using the block.json file to register your custom block. If you explore all of the properties of the block.json file, you will find a property called the example. It is an object type and you can see this object has an “attributes” property which is also an object of your custom block’s all attributes. So, simply add some default values for the block’s attributes. For example, I have a custom block called “GutSlider Block” that has a number of attributes. Now, I want to pass the default value for only one attribute called “title”. So, my codes are in the block.json file for the example property is like the below screenshot:-
"example": {
	"attributes": {
		"title": "Hello GutSlider Block"
	}
}
As a result, when I hover over the GutSlider Block, it shows the preview of the block like this:-

Great, we have added the block preview for our custom block. Here I have added only an attribute’s value. Definitely, you can add as many as you wish.
So, I hope you have understood the process and now you can apply this trick for your own custom block. Let’s dive into the advanced technique where we will have a custom image as the block preview image instead of passing any attribute’s default value
Add a Custom Image as Block Preview
It is a very common need that you may want to make your block’s preview interactive but can’t be achieved easily by passing the attributes’ value. In this circumstance, the best solution is to use a custom image as Block Preview. Fantastic idea, right?
Since we want to show a custom image, at first we have to pass the custom image to your block’s script so that we can easily use it. For example, we have the custom image inside an assets folder in our plugin. To send the image to our block’s script, you have to use wp_localize_script(). So, connect a PHP file and write the following codes [modify the codes as per your need].
function enqueue_editor_assets(){
    wp_localize_script(
       'gutslider-blocks-modules-script',
       'gutslider_preview',
        [
          'fixed_content'      => trailingslashit( GUTSLIDER_URL ) . 'assets/images/content-slider.svg'
        ]
   );
}
add_action( 'enqueue_block_editor_assets', 'enqueue_editor_assets' );
In the above codes, I have passed the custom SVG image for the Fixed Content Slider using the gutslider_preview parameter.
Now, declare a new attribute called preview for your block. In my case, I am writing my all attributes in the block.json file. So, my new custom preview attribute looks like this:-
"attributes": {
    "preview": {
        "type": "boolean",
        "default": false
    }
},
the preview block is boolean type and its default value is false.
Now, go to the example property as we already know about it, have you forgotten it? No, no, you shouldn’t forget it. Because it needs it now. We will change the preview attribute’s default value in the example property like this:-
"example": {
    "attributes": {
        "preview": true
    },
     "viewportWidth": 432
},
Keep it mind that I am still writing my codes in the block.json file. You can also make separate files for all of them as per your need.
You may notice that I have used a new property called viewportWidth, yes, the example also has this property which can be used to adjust the block preview width. For my case 432 is a good fit. It can vary depending on your needs.
You may think, it is done. Not at all, because we didn’t add the image as the block preview image yet in our block. Now, it is time to do it. So, simply go to the edit function of the custom block. I hope you already know about the Edit function. In the edit function before rendering the block’s actual content, let’s check the preview attribute’s value and if the preview is true, then return the image inside the img tag, it looks like this:-
function edit({attributes}) {
	const { preview } = attributes;

	// block preview
    if (preview) {
        return (
            <div className="gutslider-preview">
                <img src={gutslider_preview.fixed_content} alt="Preview" />
            </div>
        );
    }

	return (
		...
	)
}
Great, now the custom image has been added as the block preview for our custom block, it now looks like this:-
Conclusion
At the end of this article, I expect that you have understood each point and found the best way that suits your needs. Now, don’t hesitate, simply follow the best way that you like and implement it in your custom block. So that your users can get an awesome visual look for your block.