In the ever-evolving landscape of web development, WordPress continues to stand as a frontrunner, powering millions of websites and blogs across the globe. Its robust ecosystem of themes, plugins, and customization options has empowered both beginners and seasoned developers to create websites that are not only functional but also visually stunning.
At the heart of this transformative power lies Gutenberg, the modern block editor that has revolutionized content creation in WordPress, including the creation of custom Gutenberg blocks. Gutenberg has introduced a new era of content design, enabling users to build rich, dynamic, and interactive content with ease. Whether you’re a WordPress enthusiast or a developer seeking to enhance your skill set, this guide will walk you through the steps to harness the full potential of creating custom Gutenberg block and transform your digital presence.
What is a Block in Gutenberg?
In the context of WordPress’s Gutenberg editor, a “block” refers to a fundamental unit of content or functionality. Gutenberg is designed to provide a more flexible and intuitive way to create and structure content in WordPress, moving away from the traditional WYSIWYG editor. Instead, it breaks down content into individual blocks, each serving a specific purpose. These blocks can be text, images, headings, lists, embeds, widgets, or even custom content elements created by users or developers.
Here are some key aspects of blocks in Gutenberg:
- Modularity: Blocks are modular and self-contained. You can add, rearrange, and customize them individually, making it easier to create complex layouts and content structures.
- Diverse Types: Gutenberg includes a variety of core blocks that cover common content elements, from paragraphs and headings to images, galleries, and more. Additionally, plugins and themes can add their own custom blocks to extend functionality further.
- Customization: Each block can be customized with its own settings, styles, and options. For example, you can adjust text alignment, font size, background color, or other specific attributes for individual blocks.
- Reusability: You can save and reuse blocks, which is especially useful for consistent branding, layout structures, or complex content that you want to use on multiple pages or posts.
- Dynamic Content: Blocks can handle dynamic content, such as shortcodes, widgets, and embeds, providing a versatile way to integrate external content and functionality into your posts and pages.
- Drag-and-Drop Editing: You can move blocks up and down, rearrange them, and even nest one block within another. This drag-and-drop editing capability simplifies the process of creating and organizing content.
- User-Friendly Interface: Gutenberg provides a more user-friendly and visually-oriented interface for content creation, making it easier for users who are not familiar with HTML or coding.
- Extensibility: Developers can create custom blocks to add new functionality to the editor. This extensibility has led to a growing ecosystem of Gutenberg block plugins that enhance the editor’s capabilities.
In summary, blocks in Gutenberg are the building blocks of content creation in WordPress. They enable users to create, arrange, and customize content in a more flexible and intuitive way, opening up new possibilities for creating dynamic and engaging websites.
When a Custom Gutenberg block is needed?
Custom Gutenberg blocks are needed in WordPress when you require specific, non-standard functionality or content elements that are not readily available through the default Gutenberg blocks or existing plugins. Here are some situations where creating a custom Gutenberg block may be necessary:
- Unique Content Elements: When you want to add unique content elements to your posts or pages that aren’t covered by the standard blocks, such as custom testimonials, team member profiles, product listings, or interactive maps.
- Branding and Styling: If you have specific branding or styling requirements that go beyond what can be achieved with standard Gutenberg blocks, creating a custom block allows you to enforce consistent design across your content.
- Complex Layouts: For cases where you need complex layouts or grids that cannot be easily achieved with the default column and group blocks, a custom block can help you create the desired structure.
- Interactive Features: When you want to incorporate interactive features like calculators, quizzes, or polls, a custom block can be tailored to your specific needs.
- Integration with External Services: If you need to integrate external services, APIs, or data sources into your content, a custom block can be developed to fetch and display this data.
- Specialized Widgets: When you want to include specialized widgets in your posts or pages, such as a custom Twitter feed, an Instagram gallery, or a live chat widget, creating a custom block can help you achieve this.
- Reusable Components: For scenarios where you want to create reusable content components that can be easily inserted across different posts and pages, custom blocks can save time and ensure consistency.
- Enhanced Editing Experience: If you have a specific vision for how content should be edited and structured within the Gutenberg editor, creating custom blocks can offer a more user-friendly editing experience.
- Content Display and Organization: Custom blocks can be used to display and organize content in ways that are tailored to your site’s niche or specific user requirements, such as event calendars, restaurant menus, or real estate listings.
- Improved User Experience: When you aim to enhance the user experience on your website by providing interactive, engaging, or informative content that cannot be easily achieved with standard blocks.
In essence, custom Gutenberg blocks are valuable tools for extending the capabilities of the WordPress block editor to match your unique content, design, and functional requirements. They empower you to create a more personalized and feature-rich website, delivering a better experience for both content creators and site visitors.
Requirements for Start Block Development
Developing custom Gutenberg blocks for WordPress requires a development environment and a set of tools to help you create and test your blocks. Here are the environmental requirements and tools you’ll need to get started:
- WordPress Installation:
- You should have a working WordPress installation on your local machine or a remote server. You can use tools like XAMPP, MAMP, or set up a local development environment using software like Docker.
- Code Editor:
- A code editor is essential for writing and editing your block’s code. Popular code editors include Visual Studio Code, Sublime Text, and Atom.
- Node.js and npm:
- Gutenberg blocks are typically developed using JavaScript and the Node.js runtime. Make sure you have Node.js and npm (Node Package Manager) installed on your system. You can download them from the official website: https://nodejs.org/
- Git (Optional):
- While not strictly required, using a version control system like Git is highly recommended for tracking changes to your code and collaborating with others.
- Command Line Interface (CLI):
- You’ll need to use the command line to run various development tasks. Make sure you are comfortable with basic command-line operations.
- Local Development Server:
- You can set up a local development server, you can use Local Fly Wheel to set up your WordPress development server quickly.
- React and JavaScript:
- Gutenberg blocks are primarily built using JavaScript, particularly React.js, which is a JavaScript library for building user interfaces. Familiarity with React is important for creating custom blocks.
- ES6 and JSX:
- Gutenberg block development often involves ES6 (ECMAScript 2015) and JSX (a syntax extension for JavaScript used with React). Make sure you’re comfortable with these modern JavaScript features.
- CSS (SASS/SCSS):
- You’ll need to style your blocks using CSS. You can use plain CSS or preprocessors like SASS or SCSS to make your styling more efficient.
- Knowledge of Gutenberg Block API:
- Understanding the Gutenberg Block API is crucial for creating custom blocks. You’ll need to register your block, define its attributes, and create its render function.
- WordPress Coding Standards:
- Follow the WordPress coding standards and best practices to ensure your code integrates well with WordPress and other plugins and themes.
- Browser Developer Tools:
- Familiarize yourself with browser developer tools for debugging and inspecting your block in the browser.
- Testing Environment:
- Set up a testing environment, either by creating a test post or using a plugin like the Gutenberg Ramp or the Gutenberg Plugin itself, to see how your block works in a real WordPress context.
- Documentation:
- Keep the WordPress Block Editor Handbook and the official Gutenberg documentation handy for reference.
By having these tools and a solid development environment in place, you’ll be well-prepared to start creating custom Gutenberg blocks for your WordPress projects.
Create Your First Custom Gutenberg Block
Creating a Custom Gutenberg block involves several steps. Here’s a basic example of how you can create a custom Gutenberg block:
- Setup your development environment: You need to have Node.js and npm installed. You also need to install @wordpress/scripts package which provides a set of common scripts for building WordPress plugins and blocks.
- Create a new plugin directory: Gutenberg blocks are typically distributed as plugins. Create a new directory in your wp-content/plugins directory.
- Create a main plugin file: In your new plugin directory, create a PHP file. This file will be used to enqueue your block’s JavaScript and CSS.
- Create a block JavaScript file: This file will contain the code for your block.
- Build and enqueue your block: Use @wordpress/scripts to build your block and then enqueue the output files in your main plugin file.
Here’s what the code might look like for creating your custom Gutenberg block:
main-plugin-file.php
<?php
/**
 * Plugin Name: My Custom Block
 */

function my_custom_block_enqueue() {
    wp_enqueue_script(
        'my-custom-block',
        plugins_url( 'build/index.js', __FILE__ ),
        array( 'wp-blocks', 'wp-element', 'wp-editor' ),
        filemtime( plugin_dir_path( __FILE__ ) . 'build/index.js' )
    );
}
add_action( 'enqueue_block_editor_assets', 'my_custom_block_enqueue' );
Now create a src folder and create index.js file where keep the following codes:-
src/index.js
const { registerBlockType } = wp.blocks;
const { RichText } = wp.editor;

registerBlockType( 'my-plugin/my-custom-block', {
    title: 'My Custom Block',
    icon: 'smiley',
    category: 'common',
    attributes: {
        content: {
            type: 'string',
            source: 'html',
            selector: 'p',
            default: ''
        },
    },
    edit: ( props ) => {
        const { attributes: { content }, setAttributes, className } = props;
        const onChangeContent = ( newContent ) => {
            setAttributes( { content: newContent } );
        };

        return (
            <RichText
                tagName="p"
                className={ className }
                onChange={ onChangeContent }
                value={ content }
                placeholder={ __( 'Write your custom message' ) }
            />
        );
    },
    save: ( props ) => {
        return <RichText.Content tagName="p" value={ props.attributes.content } />;
    },
} );
Your package.json file will have the following configuration, I hope you know about it.
package.json
{
"name": "my-custom-block",
"version": "1.0.0",
"description": "My Custom Block for Gutenberg",
"main": "src/index.js",
"scripts": {
"build": "wp-scripts build",
"start": "wp-scripts start"
},
"devDependencies": {
"@wordpress/scripts": "^12.0.0"
}
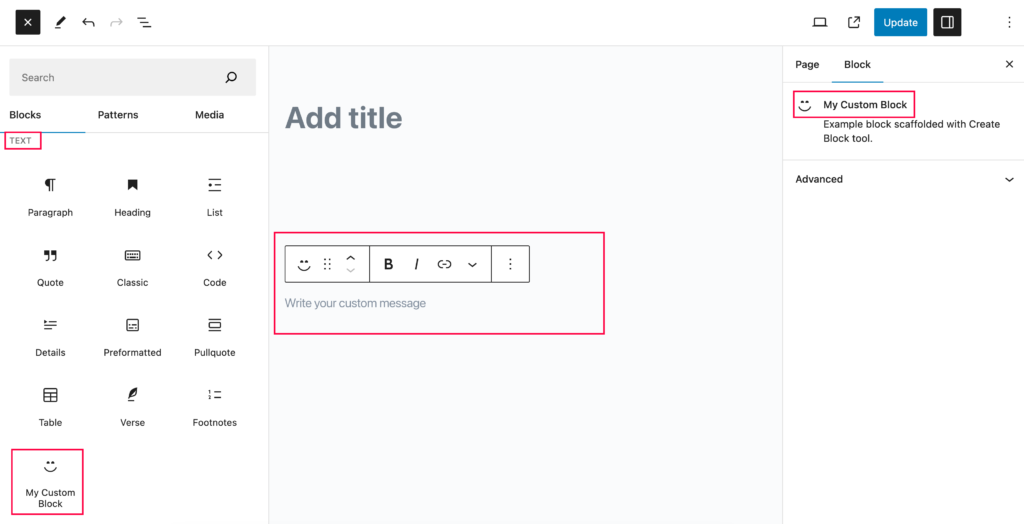
}After creating these files, you can run npm install to install the necessary dependencies and then npm run start to start the development build process. Your block will now be available in the Gutenberg editor. here is the output bloc of the above code
Create Custom Gutenberg Block Using @wordpress/create-block
Creating a custom Gutenberg block using the @wordpress/create-block package is a straightforward process. This package provides a set of tools to set up a new Gutenberg block development environment with modern JavaScript and React. To get started, follow these steps:
Install the @wordpress/create-block package globally.
This is a scaffolding tool that helps to create blocks by providing a configured starter code. You can install it using npm:
npm install -g @wordpress/create-blockCreate a new Custom Gutenberg Block.
Run the create-block command followed by the name of your block. This will create a new directory with the same name as your block, and it will contain the initial files and configuration needed.
npx @wordpress/create-block my-blockNavigate to the block’s directory:
cd my-blockStart the development build process
This command will watch for any changes you make to the block’s files and automatically rebuild the code as necessary.
npm startBuild the Custom Gutenberg block
Once you’re done with development, use this command to build the production version of your block.
npm run buildNow, you can open the src/edit.js file and start customizing your block’s edit function. The src/save.js file contains the save function for your block. These two functions are the most important parts of a block.
Remember to enqueue the generated build/index.js file in your PHP code to make the block available in the Gutenberg editor.
Conclusion
In the rapidly evolving world of web development, the power of WordPress remains unparalleled. With the introduction of the Gutenberg block editor, WordPress has transformed the way we create and manage content, making it more accessible and versatile than ever before. Through this journey, we’ve explored the art of crafting custom Gutenberg blocks, unlocking the full potential of WordPress.
Custom Gutenberg blocks are the key to breathing life into your content, allowing you to tailor your website’s design and functionality to your exact specifications. Whether you are a seasoned developer or a WordPress enthusiast, the ability to create blocks opens doors to endless possibilities. It empowers you to craft unique content elements, control the look and feel of your website, and engage your audience in innovative ways.
As we’ve discovered, the process begins with the right tools and a solid understanding of the WordPress Block Editor API. By following the steps outlined in this guide, you can create, fine-tune, and deploy custom Gutenberg blocks that cater to your specific needs.
With each custom Gutenberg block, you bring a touch of uniqueness to your website. You have the creative freedom to design content elements that seamlessly integrate with your brand, enhance user experience, and set you apart from the crowd.
As Gutenberg continues to evolve, the world of custom Gutenberg block development will only become more exciting and dynamic. So, whether you’re just starting or looking to expand your WordPress horizons, embrace the world of custom Gutenberg blocks and shape your digital presence like never before. Your creativity knows no bounds, and with Gutenberg, neither does your website’s potential.