

A wall of dates in a paragraph is hard to follow. Whether you’re telling your company’s story, sharing a product roadmap, or listing an event schedule, readers want to see the sequence at a glance. A WordPress timeline block solves that by putting each milestone on a clear vertical line, with a marker, a date and a content box.
This guide shows you how to build one in the block editor with the free Advanced Timeline Block plugin. You’ll learn which layouts to use, how to style markers and connectors, and how to keep the timeline readable on phones. No page builder and no custom code required.
When a Timeline Works Better Than a List
Timelines are great when order matters. If your reader would ask “what happened first?” or “what comes next?”, a timeline answers that visually before they read a word.
Here are the most common uses:
- Company history timeline: founding year, first product, key hires, new offices. Perfect for an About page.
- Roadmap timeline in WordPress: planned features by quarter, or a public changelog of what shipped.
- Event schedules: conference agendas, wedding days, workshop programs.
- Process steps: how your onboarding works, from first call to launch.
- Resumes and personal stories: jobs, education and achievements in order.
A timeline is the wrong choice when items aren’t sequential. Five unrelated features belong in a grid or a list, not on a line that implies order.
Meet Advanced Timeline Block
Advanced Timeline Block is a free plugin that adds a timeline block to the Gutenberg editor. It’s built with native Gutenberg components, so it feels like the rest of the editor rather than a separate builder.
The features that matter most for everyday use:
- Three vertical layouts: both sides (alternating), left side or right side.
- Separate layouts per device: pick a different layout for desktop, tablet and mobile.
- SVG markers: choose an icon from the built-in inline SVG library or paste your own SVG code. No icon font is loaded.
- Unlimited items: add as many entries as your story needs.
- CSS-based output: the timeline needs no JavaScript on the frontend.
- Full styling control: colors, padding, borders, border radius, box shadow and background for the parts of the timeline.
- Developer options: a custom anchor ID and additional CSS classes.
It works with any theme that supports the block editor, including block themes and classic themes.
How to Create a Timeline with the WordPress Timeline Block
Before you start, write your milestones down. A date or label, a short title and one or two sentences per item is plenty. Having the content ready makes the build take minutes.
Step 1: Install and activate the plugin
- In your dashboard, go to Plugins → Add New.
- Search for "Advanced Timeline Block".
- Click Install Now, then Activate.
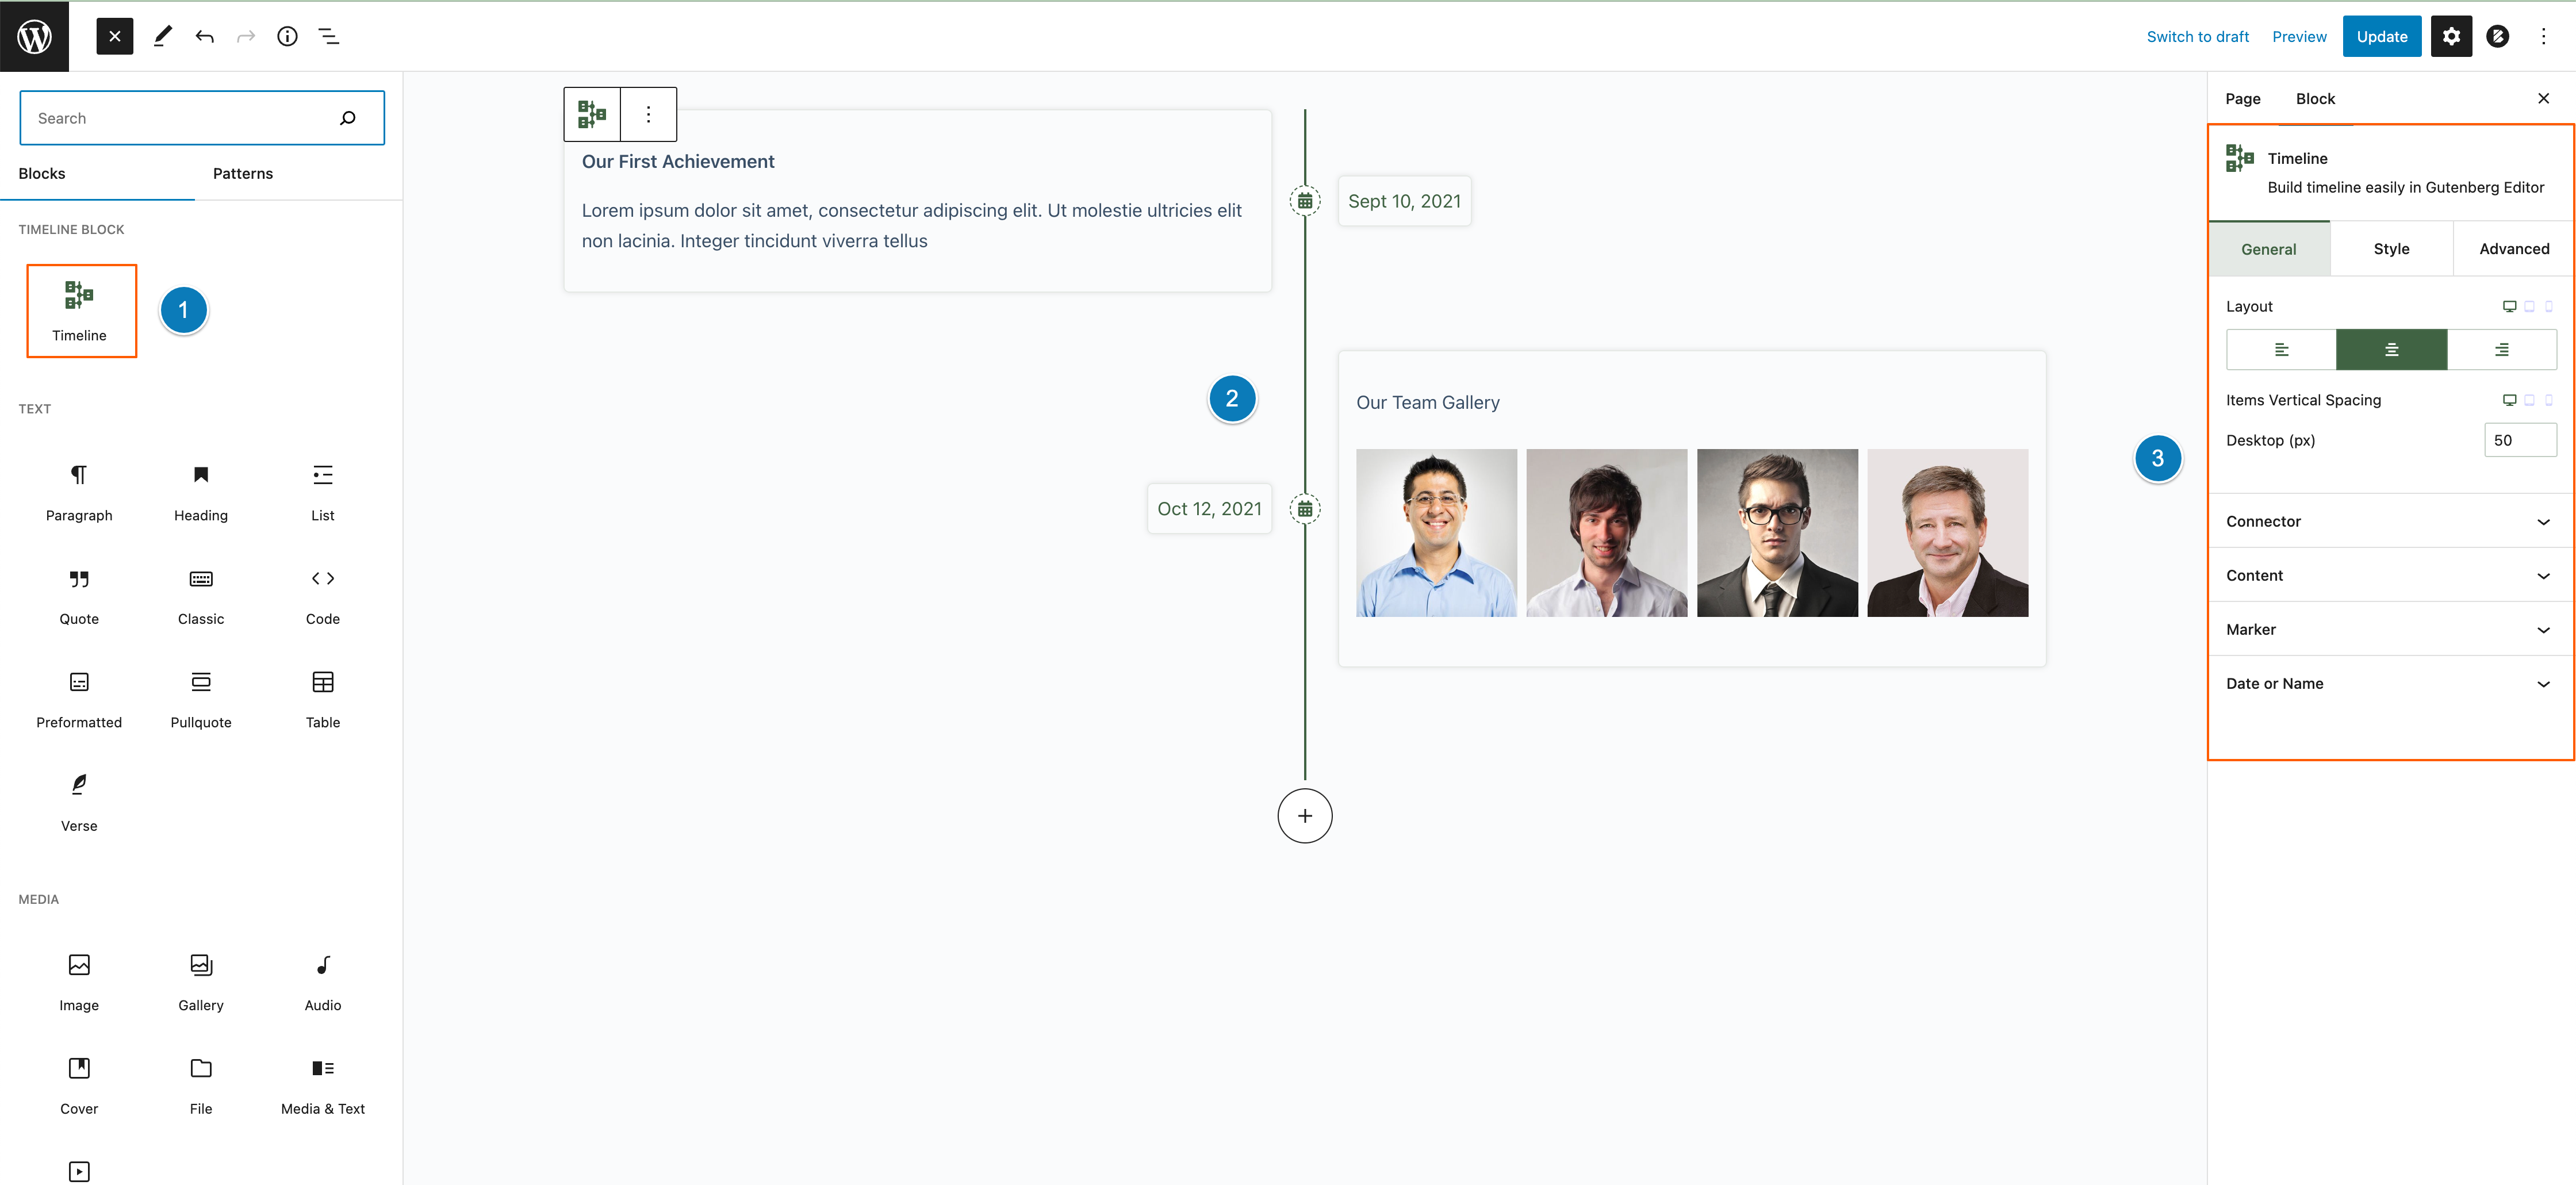
Step 2: Add the timeline block
- Open the page or post where the timeline should appear.
- Click the block inserter (the + button).
- Find the block under the "Timeline Block" category, or type "timeline" in the search field.
- Click it to insert a starter timeline.
Step 3: Add and fill your timeline items
- Add new items with one click from the block. Each item sits on the connector line with its own marker and date or name.
- Type the date or label for each item, such as "2019" or "Q2 2026".
- Add your content inside the item. A short heading and a paragraph work well, and you can include other content such as images when it helps tell the story.
- Drag items to reorder them if a milestone ends up in the wrong spot.
Step 4: Choose a layout for each device
- Select the timeline block and open the block settings sidebar.
- Under the general settings, pick a layout: both sides, left side or right side.
- Use the device switcher next to the setting to choose a separate layout for tablet and mobile.
- Adjust the vertical spacing between items so entries don't feel cramped.
A popular setup is “both sides” on desktop and “left side” or “right side” on mobile. Alternating boxes look great on a wide screen but get narrow on a phone.
Step 5: Style the connector, content, marker and date
The sidebar groups styling into sections for the connector line, the content box, the marker and the date or name. Work through them in that order:
- Connector: set the line color so it's visible but quieter than your content.
- Content: adjust background, padding, border, border radius and box shadow for the content boxes.
- Marker: choose an icon from the SVG library or paste custom SVG code, then set the marker color. Icons that use
currentColorautomatically inherit the marker color. - Date or name: style the label so dates are easy to scan.
Step 6: Preview and publish
Use the editor’s preview to check desktop, tablet and mobile views. Then publish or update the page and check it once more on a real phone.
Design Ideas for Common Timelines
Company history timeline
Use years as labels and keep each entry to one milestone. A small photo for key moments, like your first office or launch day, makes the story feel real. Use your brand color for the markers and a neutral gray for the connector.
Product roadmap timeline
Label items by quarter or month. Use different marker icons to show status, for example a check icon for shipped items and a clock icon for planned ones. Add a note that dates are estimates so nobody treats them as promises.
Event schedule
Use times as labels and a single-sided layout so the schedule reads top to bottom like an agenda. Keep speaker names and room numbers in the content box, not the label.
Keeping Your Timeline Readable on Mobile
Most timeline problems show up on small screens. A few checks fix nearly all of them:
- Switch to a single-sided layout on mobile. This gives the content box the full width of the screen.
- Reduce padding on small screens. Generous desktop padding can squeeze text into a narrow column.
- Keep labels short. "Mar 2024" fits better than "March 14th, 2024".
- Watch image sizes. Wide images inside items should scale down cleanly. Compress them before upload.
Because the timeline is CSS-based and its markers are inline SVG, it doesn’t add a frontend script or an icon font. That helps keep the page light, which supports good Core Web Vitals.
Best Practices for Timeline Content
- One idea per item. If an entry needs three paragraphs, it probably deserves its own page. Link to it instead.
- Be consistent. Use the same date format and similar content length across items.
- Lead with the outcome. "Reached 1,000 customers" beats "We worked hard all year".
- Limit the length. A dozen strong milestones are more memorable than forty small ones.
- Save it for reuse. If the same timeline appears on several pages, turn it into a synced pattern. Our guide to reusable blocks in Gutenberg shows how.
- Combine with patterns. Place the timeline inside a section from your block patterns library for a consistent page design.
New to the editor itself? The official block editor documentation covers the basics of inserting, moving and styling blocks.
Frequently Asked Questions
Is the timeline responsive?
Yes. Advanced Timeline Block is fully responsive, and you can set a different layout (both sides, left side or right side) for desktop, tablet and mobile.
Can I use my own icons for the timeline markers?
Yes. Pick an icon from the built-in inline SVG library or paste your own SVG code. Icons that use currentColor take on the marker color automatically.
Does the timeline block load Font Awesome or an icon font?
No. Since version 2.2.0, markers use lightweight inline SVG icons, so no icon font stylesheet or webfont file is loaded on your site.
Will it work with my theme?
It works with any theme that supports the Gutenberg block editor, including both block themes and classic themes.
Conclusion: Tell Your Story with a WordPress Timeline Block
A timeline turns a list of dates into a story people actually read. With a WordPress timeline block, you can build a company history, roadmap or event schedule in minutes, style every part of it, and set separate layouts for each device so it stays readable on phones.
Ready to build yours? Download Advanced Timeline Block for free from WordPress.org, and browse our other Gutenberg plugins for more blocks that fit right into the editor.



Leave a Reply
You must be logged in to post a comment.